In his latest article in the Tech Tasks series, Tom Walton looks at how to use Google+ Communities in the classroom exploring how they can be used to help students develop their listening and speaking skills both inside and outside the classroom


In my previous article, I looked at creative writing with Edmodo. Here, I’m going to look at a similar tool: Google+ Communities. Both sites allow learners to practice similar skills, with Edmodo aimed at young learners and Google+ better suited to adults.
If you’re unfamiliar with them, they are very like a Facebook group, except you ‘share’ only what you choose to share. Both are very easy to set up and equally easy to manage.
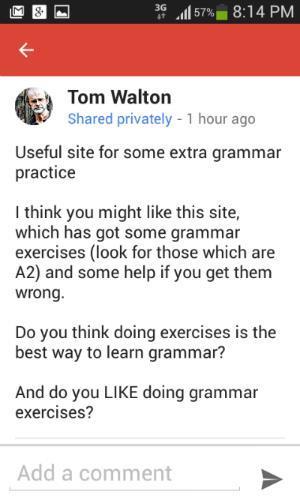
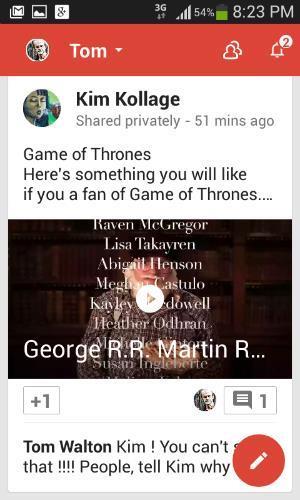
Another big advantage of a Google+ Community is that it works superbly on a mobile phone, as you can see from the screenshot on the left.
A Google+ Community is a wonderful tool for mobile learning, although we can also view it on the web via a desktop computer, and we can get all the posts sent to it in our Gmail inbox.
There are so many ways a shared digital space of this kind could be used, and there is so much that it could give you and your learners. It provides limitless opportunities for language practice, and it’s wonderful for generating good group dynamics.
The lesson plan below is designed to get your learners started with their new Community, but ideally you’d take it further and they would continue to use it to share and comment on other things throughout the term or year.
Lesson plan information
AGES 18 and above
LEVEL B1 or above – the higher you go, the more useful it becomes
TIME 60 minutes (not including any set-up time for Gmail accounts and the Community itself)
AIM To introduce the learners to their Google+ Community, and to get them excited about using it
LANGUAGE FOCUS Whatever you’ve been focusing on in your previous lessons
TOOLS REQUIRED First of all, you the teacher will need (1) a Gmail address. You then need (2) to create your first Google+ Community https://support.google.com/plus/answer/2872671?hl=en, and (3) make sure that you make it private – which is, in fact, the first thing you are asked to decide when you create a new community. Do you want it public or private? Choose private! Teachers and learners are sometimes reluctant to use social media to share things. However, Google+ is designed to be used privately. My learners don’t have a problem with the idea when they know that what they share is seen only within the private Community that I’ve created for the class. You then, (4), need the Gmail addresses of all your learners (if they don’t have one, they’ll need to create one). Finally, (5), you have to send them an invitation to your community, which is very easy.
Tip: Make one of your learners responsible for collecting everyone’s Gmail address and sending them to you in a single email. It will save you a lot of work!
TEST GOOGLE+ PRIVACY This is me on Google+. Obviously you can’t access all the things I’ve shared with my learners, or the things my learners have shared with me, as they are part of private communities!
How to teach the lesson
1. Creating your groups: Within your community, your learners are going to work in small groups before all posting to the same group. Divide your class into small groups of 3 or 4. Ideally, put at least one technically-savvy person in each group. If you have Facebook users in your class, they’ll find a Google+ Community very easy to use, as they are so similar. If your learners really don’t use technology much, be prepared to demonstrate for them. Unless you are using a computer room or tablets, you will need at least one smartphone per group.
2. Establishing objectives and rules: Each group forms a team, who are going to post up to three things of interest to their classmates, in separate posts. Their objective is to see who can get the most comments on their posts from people in the other groups. (Your objective is for your learners to get as much language practice as possible, of course.)
Tip for learners: in each post, ask your classmates at least one interesting question! Here’s an example:

Rules:
- Each post should include 30–100 words of text, and you might want to add a link to an article, an image or a YouTube video.
- At least two of the posts must be related to a topic or topics discussed in class in the last two weeks (with the breakfast pictures, we’d been talking about health, for example).
- Don’t post anything someone else might find offensive or insulting.
- At the end of each post, include the names of all the members of your team (otherwise we know only the name of the poster, not the other people on the same team).
- Try to comment on what other people post.
If you live somewhere like Barcelona, as I do, you might want to add another rule: only one post can be about football!
Other possible subjects:
- topical news items
- a useful website
- viral videos http://viralvideochart.unrulymedia.com/all
- a picture of the student when they were younger, or another interesting photo they already have on their smartphone
- one of those fun things people share on Facebook, Pinterest, etc
You might want to provide three sample posts, like the one shown below.

3. Editorial team meeting: Learners should pick the subjects they are going to post about and collaborate on writing them. If you have one device per person, they can work on individual posts once they’ve agreed on three subjects. Your job at this stage is to provide any language they might need. Monitor and offer help where necessary, as this will reduce the amount of subsequent correction that might be required.
Tip: First, have a ‘tech-free first 5 minutes’ in which your learners aren’t allowed to touch any technology. It will encourage them to talk to each other.
4. Posting: As soon as your learners have their first post ready, they should send it. They don’t have to have all three ready before they post the first. Note that posts on Google+ Communities have to be assigned a ‘Category’. You might want to establish a few categories first (things like ‘Important’, ‘Useful links’, ‘Just for fun’, ‘Exams’, ‘Videos’ and ‘Other matters’ are ones I have used). You could use ‘Editors’ for this activity, and could have a category for each team, but note that you can only have a maximum of 20 categories in a Community.
5. Commenting: Stages 4 and 5 can overlap. New posts will arrive (1) in the learners’ Gmail inboxes, as well as (2) on Google+ on their phones, but they can also (3) read them directly on the Community page, which they might want to ‘bookmark’ – i.e. make a ‘favourite’ – so they can find it again easily. I recommend that you join in and write comments yourself, as you can see in the next example.

You might also include any further language assistance in your comments. You could also at this stage suggest corrections to any of the original posts (which the authors can edit after posting). For the latter, I like to walk round the class and do that there and then, rather than having to correct afterwards.
Don’t worry if you don’t have enough devices for everyone to have their own – you can encourage group discussion and then one person in the group can reply for the group.
If your learners do have a device each, you’ll probably notice a delightful thing: suddenly, you will have silence in your classroom (or just the sound of keyboards if your learners are using computers). They’re all commenting and engaged! Wonderful!
6. Correcting: I suggest providing as much language help as you can, getting the ‘posts’ as correct as possible, but not attempting to correct all the errors in comments. It’s impossible and probably counter-productive. You want your learners to use as much language as possible and enjoy doing so!
See also ‘How I correct’: http://blogs.ihes.com/tech-elt/?p=2207
A long-term project
A Google+ Community of this kind works wonderfully not just for one class but longer term. It can be used for whatever digital activities your learners are doing and for sharing the end product (creative writing, podcasts, etc.) of those.
You can also keep the ‘editors’ activity going. What works well is to have one group creating three posts each week, with another group taking over the following week. The objective is still to obtain as many comments as possible from the rest of the class.
Alternative tools
I’ve suggested a Google+ Community here for adults, but younger learners could do exactly the same thing with Edmodo. Alternatively, you could use a blog on which you make all your learners ‘authors’. Blogger would be the tool I would recommend for that.
If you prefer each group to have their own separate magazine, Tackk is an interesting alternative. Note, however, that you will probably get far fewer comments if you have separate magazines – and you want comments, as they give you interaction and communication and more language practice.
And, yes, you could use a Facebook group for the same thing (but would all your learners/their parents want you to …?).
Things to note
If your learners opt to have ‘notifications on’, they’ll get any new posts via email. That’s great for keeping the discussion going. They can turn notifications off, if necessary!
Useful links
Google+ Communities: A Beginner’s Guide
http://mashable.com/2013/01/18/google-plus-communities-beginners-guide/
Quick Tip: Setting up a Google+ Community
http://www.techrepublic.com/blog/google-in-the-enterprise/quick-tip-set-up-a-google-plus-community/
Seven tips for using Google+ Community features
http://www.techrepublic.com/blog/google-in-the-enterprise/seven-tips-for-using-google-plus-community-features/
Becoming a great Google+ Community Member
http://paulmaplesden.hubpages.com/hub/google-plus-community-member-guidelines-advice
More ideas for using Google+ Communities
http://blogs.ihes.com/tech-elt/?cat=84
Feedback
I’m a huge believer in having a digital space of this kind for language learners. I’d love to hear how you get on if you try the idea out, or need any additional help.
Tech Tasks for the Class

The Tech Tasks series lists ideas and fun tasks to do with your students using the latest digital technologies.
- 1
- 2
- 3
- 4
- 5
- 6
- 7
- 8
- Currently reading
Tech Tasks: Learners as editors with Google+ Communities
- 10


No comments yet